Automatic irrigation system with Arduino
This post contains affiliate links. For more information, see my disclosures here.
What is Arduino?
Arduino is an easy-to-use hardware and software based open source electronics platform. Arduino boards can receive input data such as light on a sensor, a push of a button or a Twitter message and turn it into an output to activate an engine, turn on a LED light or publish something online. You can tell your Arduino what to do by sending a series of instructions to the board’s micro-controller.
This is a definition taken from the official Arduino website where they explain what it is and what you can do with it.
I have always been passionate about technology at both the user and creative levels. As a developer, I have always focused on software (websites, mobile applications, etc.), although I have also been very interested in hardware and electronics.
At first it may sound a bit ‘complicated’ to be encouraged to do some hardware projects, as it involves purchasing certain physical products and tools. However, if we develop programs, being all digital, it is much simpler and the cost is lower. All you need to do is download some software and start writing code.
Looking for a project to do in my free time, I decided to build an automatic irrigation system. I found this project interesting, useful and without much difficulty.
What are we going to need? Components
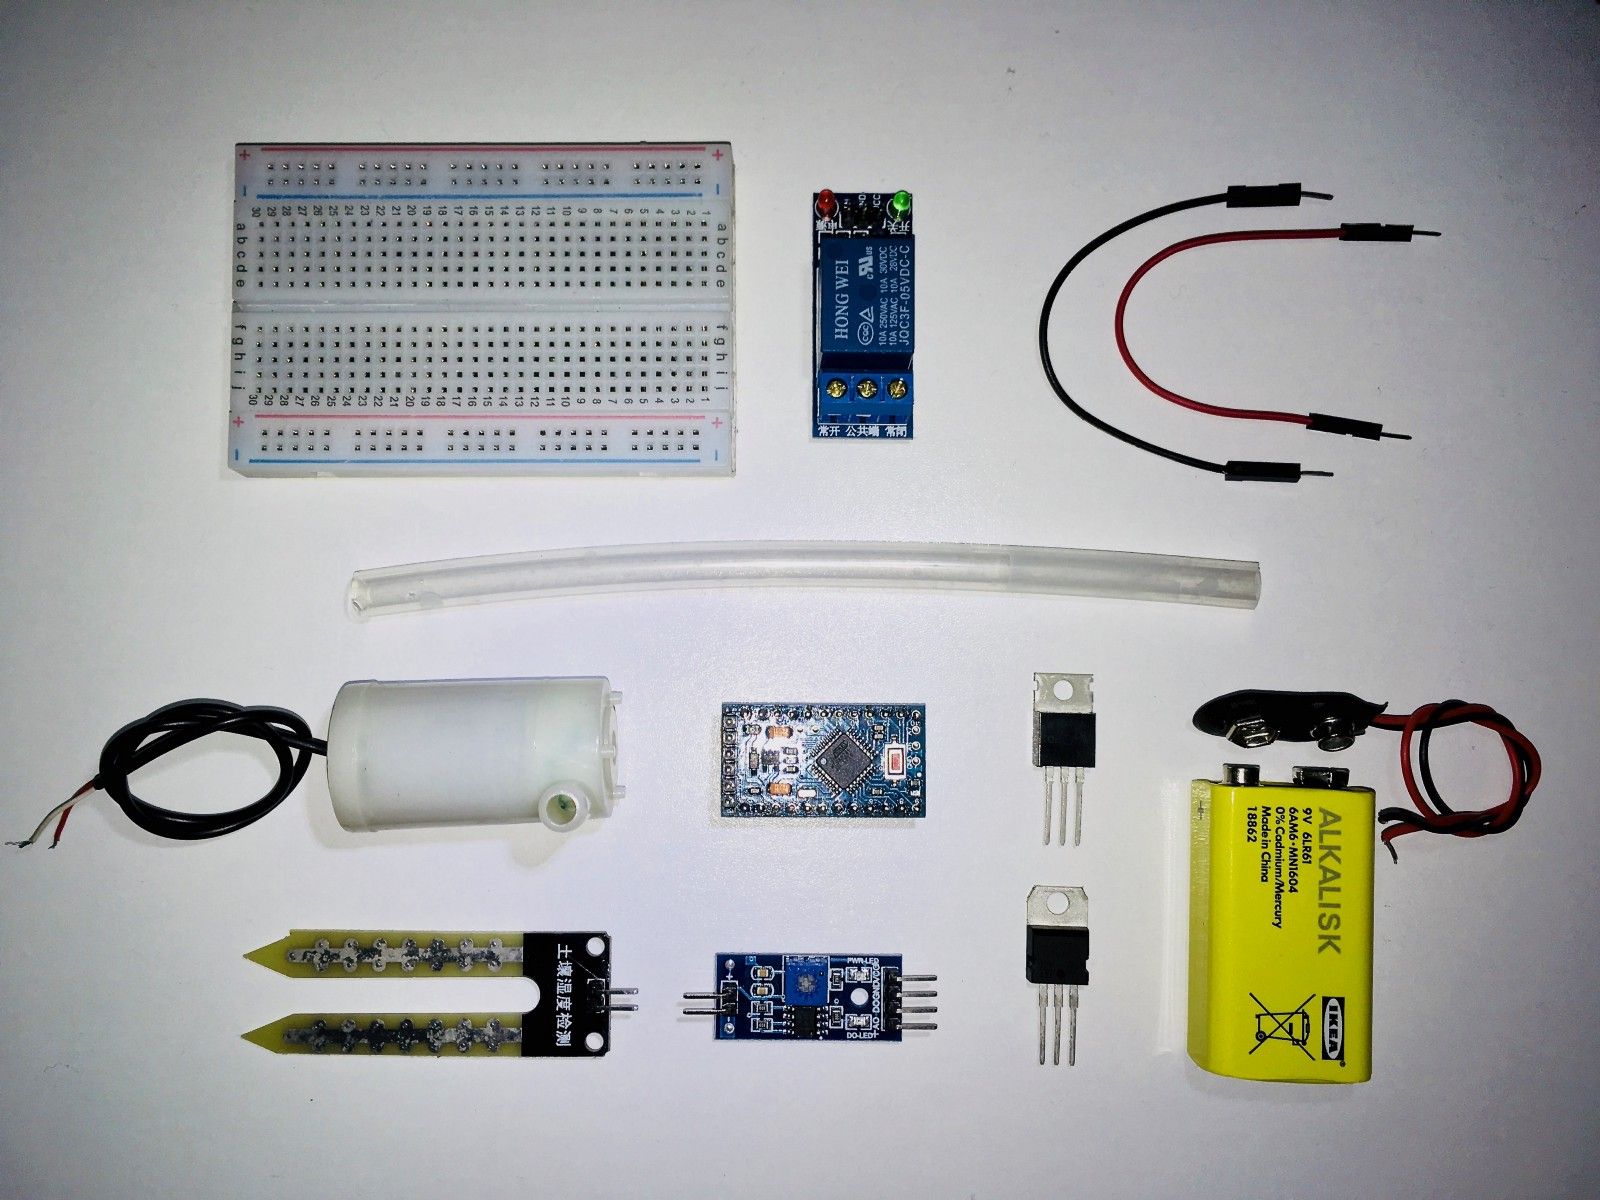
I have acquired the necessary components for this project from Aliexpress, they come from China and it is the cheapest way to get them. These are normal components that you can find in any electronics, physical or online store.
| Name | USD | EUR | Link |
|---|---|---|---|
| Water pump | $1.43 | €1.18 | Mini submersible water pump |
| Relay | $0.53 | €0.44 | 5V Relay board |
| Silicone tube | $1.72 | €1.42 | Food grade transparent hose |
| Humidity sensor | $0.58 | €0.48 | Humidity sensor module for Arduino |
| Arduino Pro Mini | $3.08 | €2.54 | Arduino Pro Mini ATMega328 |
| Transistors | $0.89 | €0.73 | IRF540 MOS Transistor N channel |
| Voltage Regulators | $0.91 | €0.75 | 10PCS Voltage Regulator |
| Breadboard | $1.08 | €0.90 | Mini breadboard |
| Wires | $0.66 | €0.55 | 40PCS jumper wire |
If we already have the necessary tools such as: soldering iron, tin, pliers and multimeter, the total cost of the components needed to assemble the system does not exceed 11 USD.
Let’s schematize our design!
Once you have purchased the components, or even earlier, you can start designing the assembly of your circuit. The reason I say you can do it earlier is because there are certain tools to emulate your circuit. I have used the tinkercad.com platform, you can use it online and it is free. Not all the components that exist are there, but it is very useful to simulate parts of the circuit.
To make diagrams like the one below, I used the fritzing tool. Unlike tinkercad, you will not have the possibility of simulating circuits but it offers a wide variety of components with which to carry out the assembly scheme.
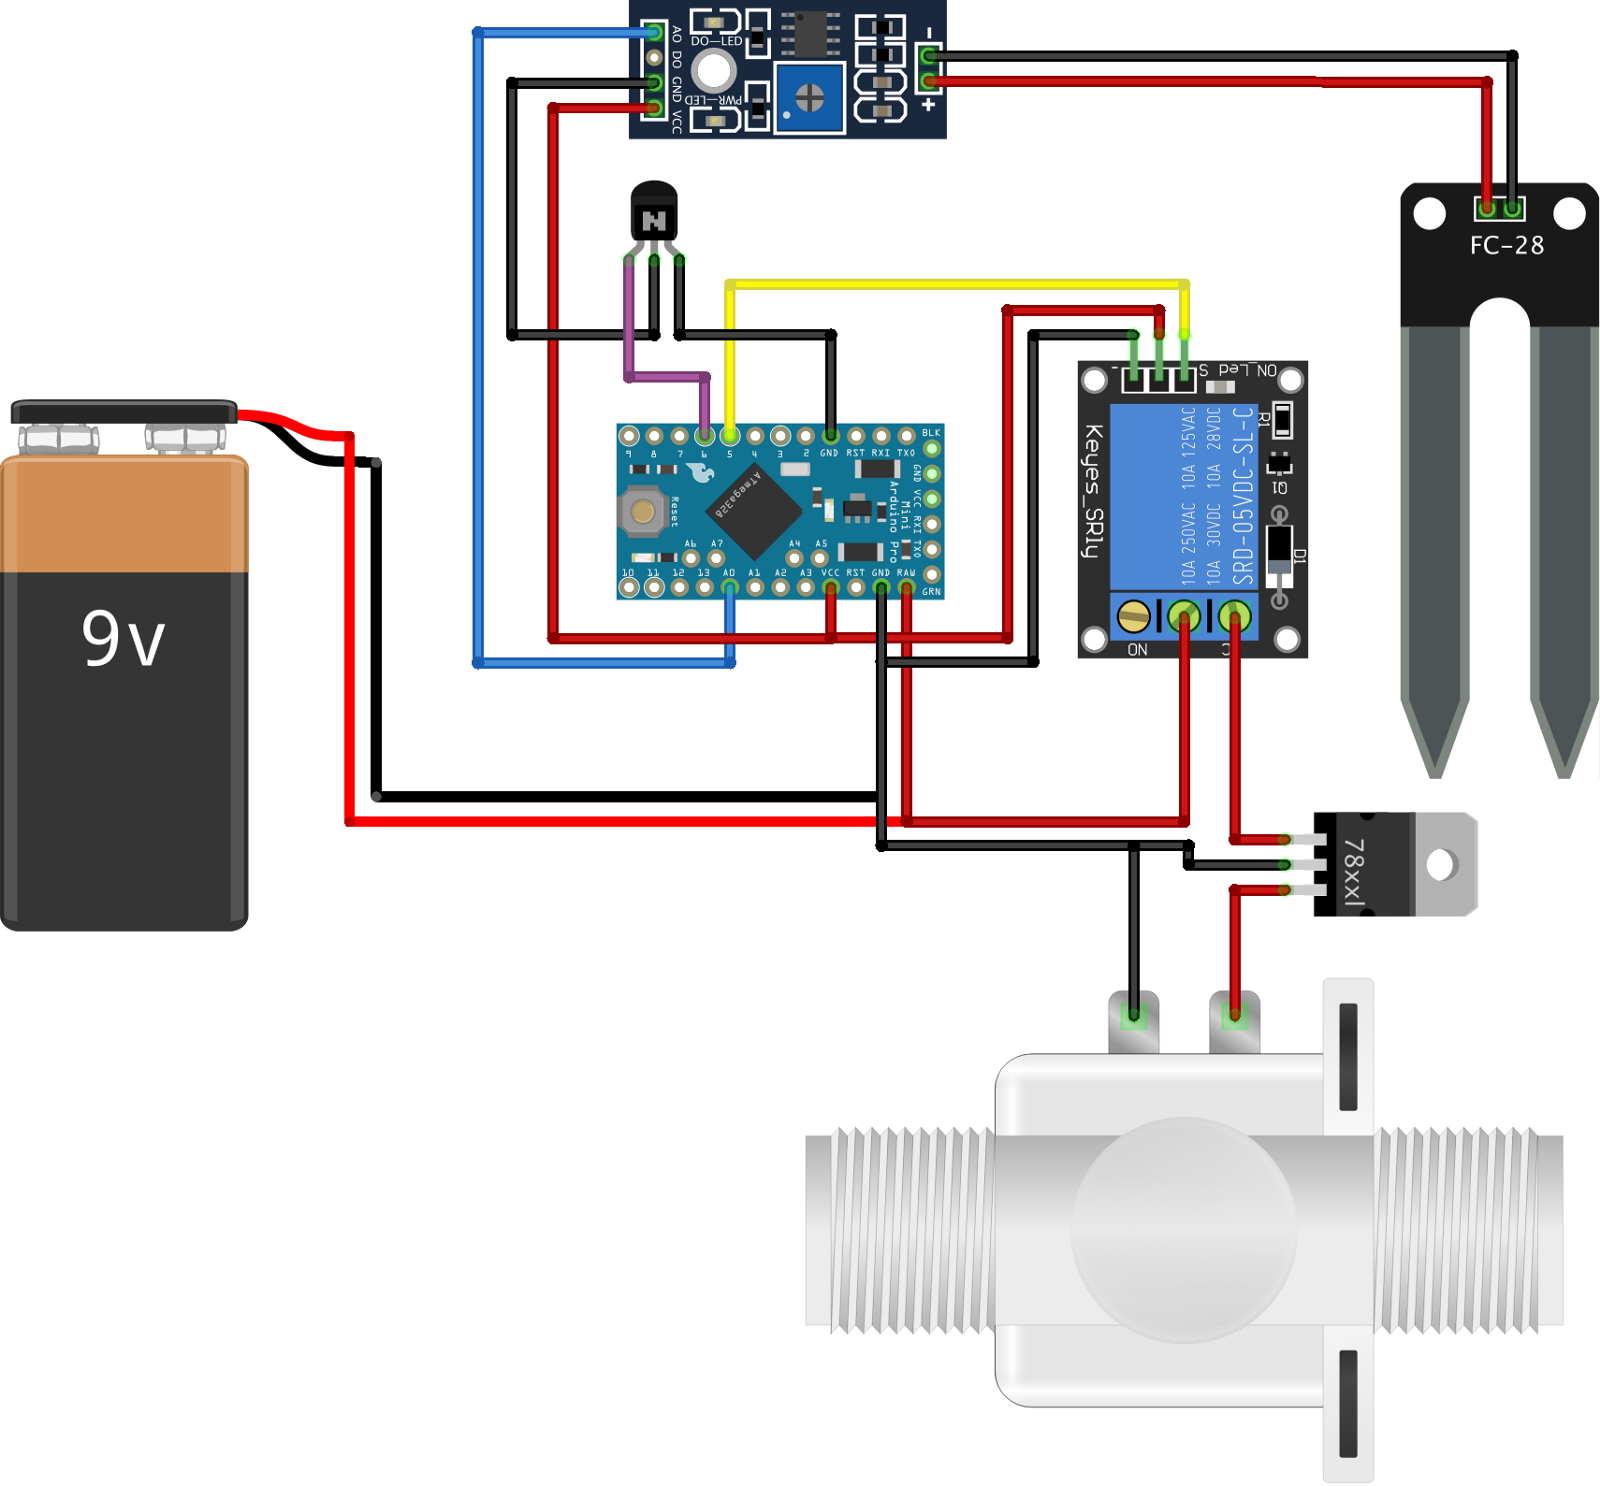
For the operation of the water pump, we will need to use a relay. You will need to connect it to one of the Arduino’s digital outputs to turn it on or off, as it receives its power from the 9V battery, previously regulated to 6V with the L7806 voltage regulator.
The humidity sensor is connected to the Arduino analog input to send the measurement data. To turn the current to the sensor on/off we used an IRF540 transistor, which we connected to one of Arduino’s digital outputs. This is done to protect the moisture sensor, as far as possible, from electrolysis (corrosion) as the current is continuously circulating.
Overview of the Code
We will start by defining the input and output pins of the sensors.
Next we’ll call a function to read the moisture in the soil. Here, I came to the conclusion of making five measurements and I got the average value, because when I activated the current flow to the sensor only at the moment of measuring, I realized that the measurements took a little while to stabilize.
After I have received the humidity level, if it is less than 35, we will call the function that activates the water pump for one second.
I used the LowPower library to reduce power consumption a little. My intention is to optimize the system so that the system only works once a day and thus save more energy.
#include <LowPower.h>

#define MOISTURE_SENSOR A0
#define TRANSISTOR 6
#define RELAY 5

void setup() {
  Serial.begin(9600);
  pinMode(RELAY, OUTPUT);
  pinMode(TRANSISTOR, OUTPUT);
  digitalWrite(TRANSISTOR, LOW);
  digitalWrite(RELAY, HIGH);

}

void loop() {
  LowPower.powerDown(SLEEP_8S, ADC_OFF, BOD_OFF);

  int moisture = readMoisture();
  if(moisture < 35)
    water();
}

void water() {
  digitalWrite(RELAY, LOW);
  delay(1000);
  digitalWrite(RELAY, HIGH);
}

int readMoisture() {
  digitalWrite(TRANSISTOR, HIGH);
  delay(10000);
  int moistureLevel1 = checkMoisture();
  delay(2000);
  int moistureLevel2 = checkMoisture();
  delay(2000);
  int moistureLevel3 = checkMoisture();
  delay(2000);
  int moistureLevel4 = checkMoisture();
  delay(2000);
  int moistureLevel5 = checkMoisture();
  int averageMoisture = (moistureLevel1 + moistureLevel2 + moistureLevel3 + moistureLevel4 + moistureLevel5)/5;

  Serial.print("Average moisture: ");
  Serial.print(averageMoisture);
  Serial.println("%");

  digitalWrite(TRANSISTOR, LOW);
  delay(5000);

  return averageMoisture;
}

int checkMoisture() {
  int sensorValue = analogRead(MOISTURE_SENSOR);
  int valuePercentage = map(sensorValue,1023,0,0,100);

  Serial.print("Mositure: ");
  Serial.print(valuePercentage);
  Serial.print("% ");
  Serial.print("(");
  Serial.print(sensorValue);
  Serial.println(")");

  return valuePercentage;
}
Future Plans
What this article has shown is just a first approach to the construction of this automatic irrigation system, but I have some improvements in mind that might be interesting to implement in the future.
- I wish everything was smaller and more compact. You could start by welding the components onto a board and even design a homemade or a more professional one.
- Another component that would be interesting to add to the system is a water level sensor. The problem with this one is that it’s not too big. If our reservoir is a bit deep, it would be impossible to measure the total water level. An ultrasound sensor can also be used to measure the distance. By installing it at the top of the tank, pointing downwards, we would be able to measure the water level in the tank. Once obtained, we may install a LED that will indicate when the water is below the established level and will indicate that the tank must be refilled.
- One improvement that I think is important is to try to reduce the energy consumption of the system. For this purpose, we can carry out software and/or hardware modifications.
- When it comes to professionalizing the system a bit, it would be a good idea to design a container with a storage space and a compartment to store the electronic system. It can be done with 3D printing.
- Finally, the system can be equipped with a Bluetooth or WiFi connection to connect it to your mobile phone or home network and have a panel where you can control certain parameters and display some statistics at the same time.
I am not an expert in the field so, I encourage you to write in the comments any improvement, modification, advice or doubt.